Notes
figured it out for myself, might help somebody else


Contents


Panasonic DECT handsets on a Linksys ATA—Solution for a dialing-out problem


After connecting a cordless phone (base unit of a three-handset Panasonic DECT KX-TG3033 set) to a VOIP system (Linksys SPA3102 ATA device behind a Mikrotik router as a home gateway), incoming calls could be received fine but outgoing calls could only be made by pressing the button 'Talk' to get a line, then dialling the number: calls made in the usual way by entering the number then pressing 'Talk' did not work, nor did choosing numbers from the phonebook.

It was noted that the dial tone ended very abruptly. The solution, found after some searching, so I'm noting it here in case it helps others, was to enter 'S5' at the beginning of the dial-plan in the ATA. This lengthens the interval (to 5 seconds) before the dial plan expires and the call fails. Remember the | (vertical bar) separator between dial-plan sequences.

For reference see "Interdigit Short Timer (Complete Entry Timer)" in the Cisco manual under "Configuring Dial Plans". The manual is the "Cisco Small Business SPA2102, SPA3102, SPA8000, SPA8800, PAP2T Analog Telephone Adapters Administration Guide (undated)" and may be found as ATA_AG_V3_200809_AdminGuide.pdf or as ATA_AG_v3_NC-WEB.pdf etc.

Denis de Castro, 31 October 2021. Comments and corrections are welcome (BMCP@pm.me).

Recipes and Scripts for Mikrotik RouterOS


RouterOS is the onboard operating system of Mikrotik routers. The documents in this folder may be of some use to others using these devices. Please send corrections and comments to BMCP@pm.me.

RouterOS ‘recipes’
These are various notes I’ve made at a beginner level about how to get things done, such as setting up a router from scratch, bridging ports or isolating a port from a bridge. There is a note on interpreting the results of the cable-test command (with some !!science!!), also a reminder about CIDR notation with a list of private IP addresses.
Terminal and scripting commands.txt
This file is a collection of beginner’s notes on the 'RouterOS scripting language', which is a shell dialect, at a level perhaps easier to grasp than the denser language specification available from Mikrotik.
About RouterOS resource files and scripts
A .rsc (RouterOS resource) file can be uploaded to a router's storage area 'Files' and run with /import <filename>.rsc in the Terminal. A .rsc file for a subset of the router's firmware can be run in the Terminal and will then appear in the appropriate section of the console, eg a .rsc file containg a script file will add the file to System>Scripts.
Scripts which send a report by email should already have Tools>Email set up and working.
System>Scheduler can be used to activate scripts at a set interval. Indicate the script to fire by entering /System script <script-name> in the field 'On Event'.
script router-report
This script generates an email which reports general information about a router.
Some data need to be entered in the first few lines of the script such as the email destination address.
Whether it fits your needs depends on what router functions you use––it does not for example deal with queues or Hotspot. The lines about WAN links do not include SFP or wifi interfaces.
An example of the sort of email the script produces is included as 'router-report sample email.txt'.
The script works currently under RouterOS v.6.49 on both a RouterBOARD (RB3011) and a Cloud Router Switch (CRS109) and should work on other models with modifications where necessary..
A function to look up device vendors from MAC addresses is also enclosed separately as 'fragment-get vendor of device by MAC address.txt'.
script security-report
For the security-conscious, here's a little routine that checks a few things twice a day and sends out an email if it discovers anything suspicious.
As previously, email needs to be set up on the device and some data need to be entered in the first few lines.
An example of the email report the script produces is included as 'security-report sample email.txt'.
The script works currently under routerOS v.6 on an RB493G and an RB3011 and should work on other Mikrotik models, perhaps with modifications.
script backup-and-config-report
A standard backup script.

Denis de Castro, 13 April 2022. Corrections please to me at BMCP@pm.me.

Vademecum

Some notes I print out and carry around in my notebook for quick reference.


Statistics
Physics
GIMP
Denis de Castro, 27 January 2022. Corrections and comments are appreciated. If you'd like have your own snippets shown here please send them in. You can reach me at BMCP@pm.me.

Backup from a Synology Disk Station with DSM 4.2 to an Apple Time Capsule


Had these two older devices that could be put to use in backup. The Synology DS409slim ('DS') is great little box (replaced it with a DS212 but went back to it). Also had an Apple Time Capsule handy ('TC'; 1 TB, ’second-generation’).

The old version of Disk Station Manager (4.2) on the DS doesn't have an app to back up to non-Synology devices on the local network, but found I could mount the TC in the filesystem of the DS and run backups with the DSM 'backup and restore' feature. How to do this was not so obvious so I'm documenting it here in the hope it might be useful to someone.

On the Time Capsule, which should have a static or fixed IP address, share the enclosed disk by ethernet (or wifi, not tested) and note the partition name (with no spaces or odd symbols in it) and password. At this stage it may be useful to set up a folder tree of the locations you intend to use for storage (by accessing the TC filesystem from another machine), and note the destination folder name(s).

On the Disk Station, in Control Panel>’File Sharing and Privileges’>Win/Mac/NFS>Windows File Service, check 'Enable Windows File Service' (missed this at first), and don’t touch it again. In File Station>Tools select 'Mount Remote Folder' (see the illustration below). The only protocol available is 'CIFS'. In 'Folder' enter the path to the partition you have named on the TC disk, in this special format (note the backslashes): '\\<IP address>\<partition-name>', eg ‘\\10.0.0.7\backups’. If you have prepared a destination folder on the TC, you can continue the address with a path to the folder you want to backup to, e.g. ‘\\10.0.0.7\backups\records\2021’. In 'Account name' enter any name, such as the name of the TC. In 'Password', enter that used for the TC device, or disk, or account. 'Map to' will contain the mount point on the DS for the remote folder (it’s nothing to do with choosing which folder to back up). It will fill in automatically, and generate a corresponding a folder in the DS file hierarchy.


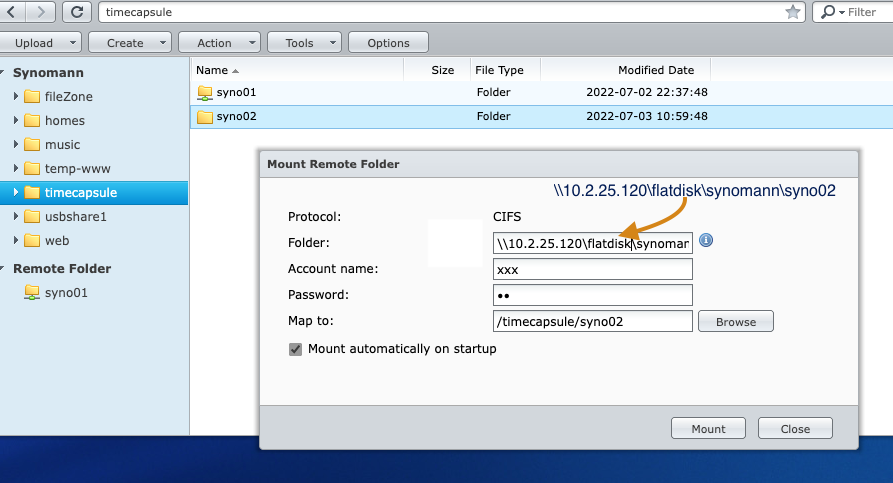
FIgure 1. Mounting the remote folder.


You may prefer to set up mount points on the DS yourself. For example you can set up a dedicated ‘Shared Folder’ (Control Panel>Shared Folder>Create and Set Permissions) such as “timecapsule” as shown in the figure above, to hold the mount points. You can then, in File Station, set up a folders for the mount points inside it and use the Browse button against ‘Map to:’ to select them, or, perhaps easier, don't create the folders yourself in File Station but press the Browse button by ‘Map to:’ and create folders for mount point at locations you choose. Automatic mounting on startup of the DS is available here, which will be needed if you plan to automate backups. Mount the shared partition.

When successful, the mounted folders and their contents will show in the sidebar of File Station under 'Remote Folder' as shown in the second illustration, with information about them given in the Connection List at File Station>Tools>Connection list>Remote Folder as shown in Fig. 3.


FIgure 2. Remote folders as shown in the File Station sidebar.


FIgure 3. Checking the Connection list.


Getting remote folders to mount does not always happen easily. Check for any mistakes. If you have to retry, make sure the DS does not already consider the folder mounted by checking the Connection List, and that the path on the TC has not been changed.

Now Disk Station Manager's 'Backup and Restore' function will happily use the TC as a backup destination. And if Notifications is set up right you can have a message about the success of the backup sent to you. However, Backup and Restore will only schedule one job to a particular remote folder, so if you want to schedule more than one backup job you need to set up a mounted remote folder for each of them.

A note about security.

The share from the TC to the DS by CIFS is limited to the obsolete protocol SMB1 at the TC. SMB1, at least on unpatched Windows boxes, is vulnerable to malware like WannaCry, which can spread among machines (eg reference 1), and in the mid-2010s ransomware did invade unpatched Disk Stations exposed to the internet (Synolocker—reference 2). So the setup described in this note should only be used in an environment protected from the internet by appropriate measures (but don't block the TC from the DS by the firewall on the DS or on a router).

References.
1. blog.malwarebytes.com/cybercrime/2017/05/how-did-wannacry-ransomworm-spread/. Seen Dec '22.
2. synology.com/en-global/security/advisory/SynoLocker. Seen Dec '22.

Denis de Castro, 7 December 2022. Comments and corrections are welcome (BMCP@pm.me).

A fix for problem of Lubuntu on an Acer Swift waking directly after suspend


Enjoy Chromebooks very much—solid little device to take about with you—but I wanted to try something with more RAM and storage. Picked up an Acer Swift 1 (SF114-34). Looked at Chrome Flex, but wanted to preserve the Windows install in case of resale. Tried FydeOS (17), openFyde and Deepin (20.9) but couldn't get the trackpad working. Installed Lubuntu 22.04, which generally works very well. One problem noted is that on 'suspend', after lid-close, idle timeout, or screen 'button' press, the system wakes up after a few seconds of sleep.

Turns out there's a list of devices that could wake the system in /proc/acpi/wakeup. You can look through it to see which devices are 'enabled' to interrupt sleep. The devices are represented by four letter "ACPI codes" which can be interpreted with some effort (XHCI is a USB3 controller, PBTN is a power button etc), although there is apparently no definitive source as they're 'vendor-generated'.

These devices can be toggled between enabled and disabled with
 echo <ACPI code> | sudo tee /proc/acpi/wakeup
so you can test for the sleep-inhibiting device(s). In my case the device that interrupted sleep was 'RP05' (apparently a PCI bus device), so
 echo RP05 | sudo tee /proc/acpi/wakeup
allows suspend to operate properly. This may be the same for other laptops of this model.

However, this fix will not persist through a reboot. For a 'permanent' fix, a systemd unit file can be enabled. Following the post of Hrishikesh Kadam and others (reference 1) I wrote a short script in ~/scripts;
 #!/bin/bash
 if grep -qw RP05.*enabled /proc/acpi/wakeup; then
 echo "RP05 is enabled in the wakeup list"
 sudo sh -c "echo RP05 > /proc/acpi/wakeup"
 echo "RP05 has been disabled"
 else
 echo "No action taken; RP05 is already disabled in the wakeup table"
 fi
(the echoes to the console can be removed once it's known to work)

Then a systemd unit file is prepared along these lines;
 [Unit]
 Description=Disable device from causing wakeup
 [Service]
 ExecStart=/home/<your-username>/scripts/<name-of-your-wakeup-fix-script>.sh
 Type=oneshot
 [Install]
 WantedBy=multi-user.target
Copy or move the file to /etc/systemd/system, enable it to run at startup with;
 systemctl enable <name-of-your-systemd-unit-file>.service
then reboot, and see if the wake-after-sleep problem has gone away.

Notes.
Previously, editing rc.local was used for this problem. A different fix is given in reference 2. Another method might be a script driven by a cronjob on boot.

References.
1. https://askubuntu.com/a/1316641. Seen Oct '23.
2.. https://askubuntu.com/a/1469469. Seen Oct '23.

Denis de Castro, 12 October 2023. Comments and corrections are welcome (BMCP@pm.me).

Some progress in controlling the Kerui M7 wireless infra-red doorbell


the Kerui M7 ringer box This little device is an easy way to have a chime ring inside when there's someone arriving at the house. And both parts, the detector which sits outside, and the ringer inside (shown in the image at left), can be supplied with power by USB, which saves recharging batteries. But how to use it is not so obvious, even with some videos available online. All we wanted to do was sound a chime on the ringer when one detector outside was activated by its infra-red sensor. Important was being able to mute the system, for example when known activity was going on in front of the detector, without having to redo the ringer's settings afterwards. Our model did not have a separate on-off switch.

After some experimentation—information accessible online was not much help—I found that the machine could be toggled on or off by a long press (until the light flashes) on the 'lower' button, i.e. the one decorated with two quavers.

Otherwise, the 'upper' button, labelled 'M' ('mode'), when pressed cycles between 1. a fixed welcome message, 2. an alarm siren sound, 3. a ringtone, which is what we wanted, and 4. a light. The 'middle' button, stamped with four rectangles, cycles among the 4 volume levels (4 -> 3 -> 2 -> 1 -> 2 -> 3 -> 4). The 'lower' button, decorated with two quavers, with short presses cycles through a (generous) list of available ringtones.

Denis de Castro, 15 January 2023. Comments and corrections are welcome (BMCP@pm.me).


BMCP 2023

home